Saturday, June 8, 2013

Affnan's Bell Siphon for Hydroponics/Aquaponics

Peppers growing in the outdoor hydroponic system.
I've added an Affnan's Bell Siphon to my outdoor, hydroponic garden. We understand the perks of hydroponic gardening, high yields in condensed space, timer-assisted automation and the production of high-quality, non-GMO foods.

It would not be possible to pack those plants so tightly without adding oxygen to the nutrient solution. I know, we plant airstones in the reservoir, in grow beds and anywhere else we can.

Bell filter is under the rock, on the left.

I found something I like better. Last summer, I dabbled in aquaponics, in an effort to cut cost on nutrient solutions and produce additional food (tilapia). One of the greatest discoveries was how to constantly flood and drain an system, with the use of a bell siphon. The siphon allows the table to flood slowly, and drain quickly. I had no problems with roots rotting, which means there's is plenty of oxygen in the solution. It eliminated timers, and allowed me to operate with a very small (and inexpensive) pump.

Check out this link to Affnan's Bell Siphon. Easy to build (hmm, maybe I'll blog about it). The key is to get  the nutrient solution flowing at a rate that allows the proper overflow start, but not so fast as it doesn't allow the system to "choke" off. It's a delicate science, but once it's working correctly, there's no longer need for timers. the system runs continuously, and adds a significant amount of oxygen, to the solution.

You've heard it from me before. Dissolved oxygen to the roots yields significant hydroponics/aquaponics success.

Wednesday, July 4, 2012

Building an Aquaponic Biofilter for $40 or less

Homemade biofilter creates aquaponic magic!
A biofilter is a key component for success with your aquaponics system. The secret to a phenomenal aquaponic system is creating a colony of helpful bacteria that help eliminate the ammonia that is harmful to fish and convert it to nitrates that create a healthy system for the plants to thrive. A biofilter helps make this happen.

Here's a few simple steps and tips to help you build your own aquaponic biofilter for less than $40.

Note: My filter uses a 1/2 inch intake (from a small pump) and a 1" output. You could easily double that by using a 1" intake and a 1 1/2"-2" output.


1A: 1" PVC to two elbows create a "swirl"


Supplies List
5 gallon bucket
1" sch. 40 PVC elbows
1" PVC T
1" bulkhead
4" of 1/2" drain hose
1/2" bulkhead
16" PVC 1"
3" PVC 1"
(note: most of my PVC pieces were scrap)
Some sort of a ball valve for the bottom drain
2 Media screens (I used bucket lids and drilled)
Media (I use a combination of bioballs and hydroton)
Aquatic tank filter material (I use Matala filter)


First, I drilled the hole for the 1/2" output drain (for sediment) and added a drain hose and ball valve, as low as I could get it on the bucket (see top photo). I drilled the larger hole for the 1" output drain close to the top of the bucket (I had a scrap bulkhead - may look funny).

I built the PVC piece pictured in figure 1A. I'll cover this with media screen (about 2" up from the bottom of the bucket) to allow an area for particles to settle. I can use the valve on the 1/2" output to drain/clean the sediment. I'll pour directly into our outdoor gardens or pour through the wormbeds, as this area is typically full of fish poop.

Media screen made from extra bucket lid.
I bought a couple extra 5 gallon bucket lids at home depot for $2 each. After cutting them to fit with a jigsaw and drilling holes, they make perfect media screens (one for below the media and one for above).

I put the lower screen in place and cut some of the matala filter material into a circle (snug fit) above the bottom media screen. Followed by adding 2 gallons of blue bioballs (a product that has a lot of surface area for bacteria to grow on) and covered with hydroton, some of which already had bacteria from my other system. The bacteria will form on it's own, but takes much longer.

Note: I'm testing out this product (bioballs). You could probably make due with hydroton or even pea gravel, etc. The important part is having lots of surface area on your media.

I'm experimenting with the idea of topping off the bucket with hydroton and putting plants in here. Just a thought. I'm sure it works great either way.

The hydroton already has bacteria growing in it.
I put the second media screen on the top and allow about 3" of space between the top of the media and drain. Just treated water flows in this area, and will make it's way out of the filter through the 1" output and to the raft tanks (hopefully, full of nitrates).

I put the lid on and added the 90 degree elbow to the 1" input tube. I had to add an adapter for the 1/2" hose that will bring water up from the tank below. The water will flow down the tube and swirl out the solids in the bottom of the bucket. Then the water (full of ammonia) will rise through the media and the helpful bacteria will convert ammonia to useable nitrates.

I may try and add another matala filter
below the media screen
The output tube can flow out into grow beds or in this case into a deep water culture table with floating rafts.

I needed to add an adapter to work with 1/2" input.

Sunday, May 27, 2012

Aquaponic NFT & Ebb and Flow System Plan

The plan for converting our hydroponic ebb and flow system to an aquaponics NFT and ebb and flow system.

Funny that the plan continued to change throughout the process, but this is how the conversion project turned out. I'll give you the photo tour of the pieces and share what I've learned.

The project started because we had an old hydroponic ebb and flow table (once a Marine Science Touch Tank) that we were sick of paying for overpriced nutrient solution. The story of the history behind the aquaponics conversion - Part 1

Built a NFT (Nutrient Film Transfer) system to supplement the grow beds.

The large pond we were digging, allowed for a significant amount of grow area (more than the two grow beds. We found great PVC tubes and decided to add an NFT component. We added 1/2 inch hosing and individual drip emitters (these were a bad idea-clogging). Eventually, I removed a majority of the emitters and just allowed for constant flow form the holes in the 1/2 inch hose. I just needed to help each plant get roots down into the bottom of the pvc. Because of space we stacked the PVC tubes vertically, with each draining into the one below it, and creating a cool water feature.

1100 gallon pond awaiting tilapia
The whole system with starts in.

Here's the links to a few of the other blogs about the conversion, and additional photos.


Tuesday, May 22, 2012

New Aquaponics System - Nearly Done!

The NFT system draining into 2nd bed
Just checked my last to-do list and I'm doing well.
Both growbeds are operating well. I transplanted some of the cucumbers, tomatoes and lettuces into both the NFT system and the second bed, and upgraded the peppers to sturdier pots, for support.

The "Duckweed" sediment tank
I've added a second sediment tank to grow duckweek, and support pumping solid-free water into the NFT system, so as to not clog it. Currently, the second tank is in need of a bulkhead, to allow for drainage. I've been working the system manually to avoid overflows. The plan is for the first growbed to flood directly from the pond and then drain to the sediment tank that is supporting the duckweed. The duckweed tank will help remove solids from the water pumped to the NFT system.

The NFT system is working great and drains (as a water feature) to the 2nd grow bed. That bed drains through the second sediment tank and back to the pond.

We have been cycling the system for about two weeks. We started checking Ph, alkalinity, nitrites and nitrates. There are still no nitrites or nitrates, but Ph and alkalinity were fine. I need to introduce some ammonia to get some bacteria growing. I believe we'll have fish by tomorrow.

The pond is waiting for fish (duckweed growing)

The NFT System is fed from the duckweed tank.


To do list (this helps keep me on track)...

1. Get fish in the pond (they're on their way)

2. Put the new 2" bulkhead in and plumb the "duckweed tank" to the pond
3. Plumb everything correctly (no more temp fixes) and secure pipes
4. Build filters for both sediment tanks and install.
5. Get some fish food (like not enough duckweed, yet).
6. Fill the system with plants

Wow! That's kindof a short list. That's exciting.


Monday, May 14, 2012

Converting the Hydroponics System to an Aquaponics System (Part 3) -NFT System

NFT System added to Aquaponic grow beds.
 We've been continuing our conversion from a hydroponic ebb and flow table to a closed, aquaponics system. We've discovered some great resources along the way, and encountered a few challenges.

The pond has about a 1000 gallon capacity and after using a media bed sizing tool, discovered we'd be able to increase our media-bed space. We wanted to be sure that any addition we made would increase the aeration of the system, help heat the water, and fit into the available space in the greenhouse. The solution was to add an NFT (Nutrient Film Technique) system would be perfect. NFT systems require a shallow stream of water (and in our case continuous drip), runs through the media to provide essential nutrients to the roots.

The PVC tubes fit with emitters and drains.


I was lucky enough to find four, ten ft., capped-pvc tubes. I drilled for 1/2 inch irrigation hose and added 18 drip emitters on two inch X 1/4 inch tubing. The 1/2 inch lines would be fed off a 3/4 inch feeder hose, run through a manifold, that feeds directly from our pond (soon to be stocked with tilapia). I was looking for a source for a clip to hold the 1/4 inch tubing in place for the individual emitters. I bought the post style version , cut off the post and drilled and glued the clips in the holes (perfect).


Emitters are working and basil growing.
We'd be building the system vertically (space issue) for the individual tubes to drip into each other, before ultimately dripping into the grow beds. Fabricating the rack was as simple as building a four shelved unit and attaching it to the grow bed and the wall. I temporarily mounted the manifold, as I wanted to see if height adjustments needed to be made. Each tube was filled with hydroton and basil and lettuce start (in rockwool) were inserted, one per emitter. I slid the tubes into place and adjusted the drains, so that each drained into the one below it. I fired up the pump and adjusted the valves on the manifold to get flow correct. I needed to make slight adjustments to the sprinkler heads to ensure each are pointed in the right direction.


I had enough starts to fill three of the racks. We'll wait 10 days or so and start the next tube, with additional lettuces.

System seems to work great. The flow is perfect. It fills the lower grow bed at a slow rate, and the bell siphon drains it quickly. Perfect.

Sediment tank will help grow duckweed
I made a few cosmetic and a few practical adjustment to the sediment tank. We'll eventually grow duckweed in this tub and we'll have a couple of filters to help keep any solids from flowing back to the pond. I started the pump and we are now cycling 24 hours a day, for the first time.

We'll start tracking Ph, Nitrates, Nitrites and Ammonia, soon. Hopefully we'll start seeing signs of nitrites and nitrates that will show us the system is working.


To do list...
1. Get duckweed started
2. Start managing the science of the water (checking regularly)
3. Get the second growbed on-line and tee the 3/4 inch feed from the pond.
4. Build a third rack to support adjusting the tubes to drip only to the corner of the bed.
5. Add additional aeration (hopefully only temporary, but I want the water ready for fish.
6. Get fish
7. Start more lettuce for NFT
8. Transplant peppers and cucumbers into growbeds

Tuesday, May 8, 2012

The Conversion from Hydroponics to Aquaponics (Part 2)

Last year's #hydroponic peppers!
The expense of organic nutrient solutions drove the decision to convert our successful hydroponics system to an aquaponics system.

We understand physics, monitoring for Ph, nitrites, nitrates, and ammonia, what could go wrong? We are responsible enough to grow duckweed to feed the tilapia, aren't we?

There are a few moving parts. We'd need to convince our facilities staff that a pond in the greenhouse would allow us to share with kids the wonder of a self-contained system that brings food to the masses (or at least a few salads and some salsa). We'd need to work in a limited amount (and shape) of space, creating custom systems that work around pre-existing teaching and plant locations. We learned permits aren't necessary in WA, but we'd need to look into locally sourced fish.

We'd need to manage the expense of taking a perfectly fine hydroponics system, working at 100% efficiency and sink some additional money into the conversion to a system with additional risk of things that could go wrong.

Yeah, we're in. We love a challenge.
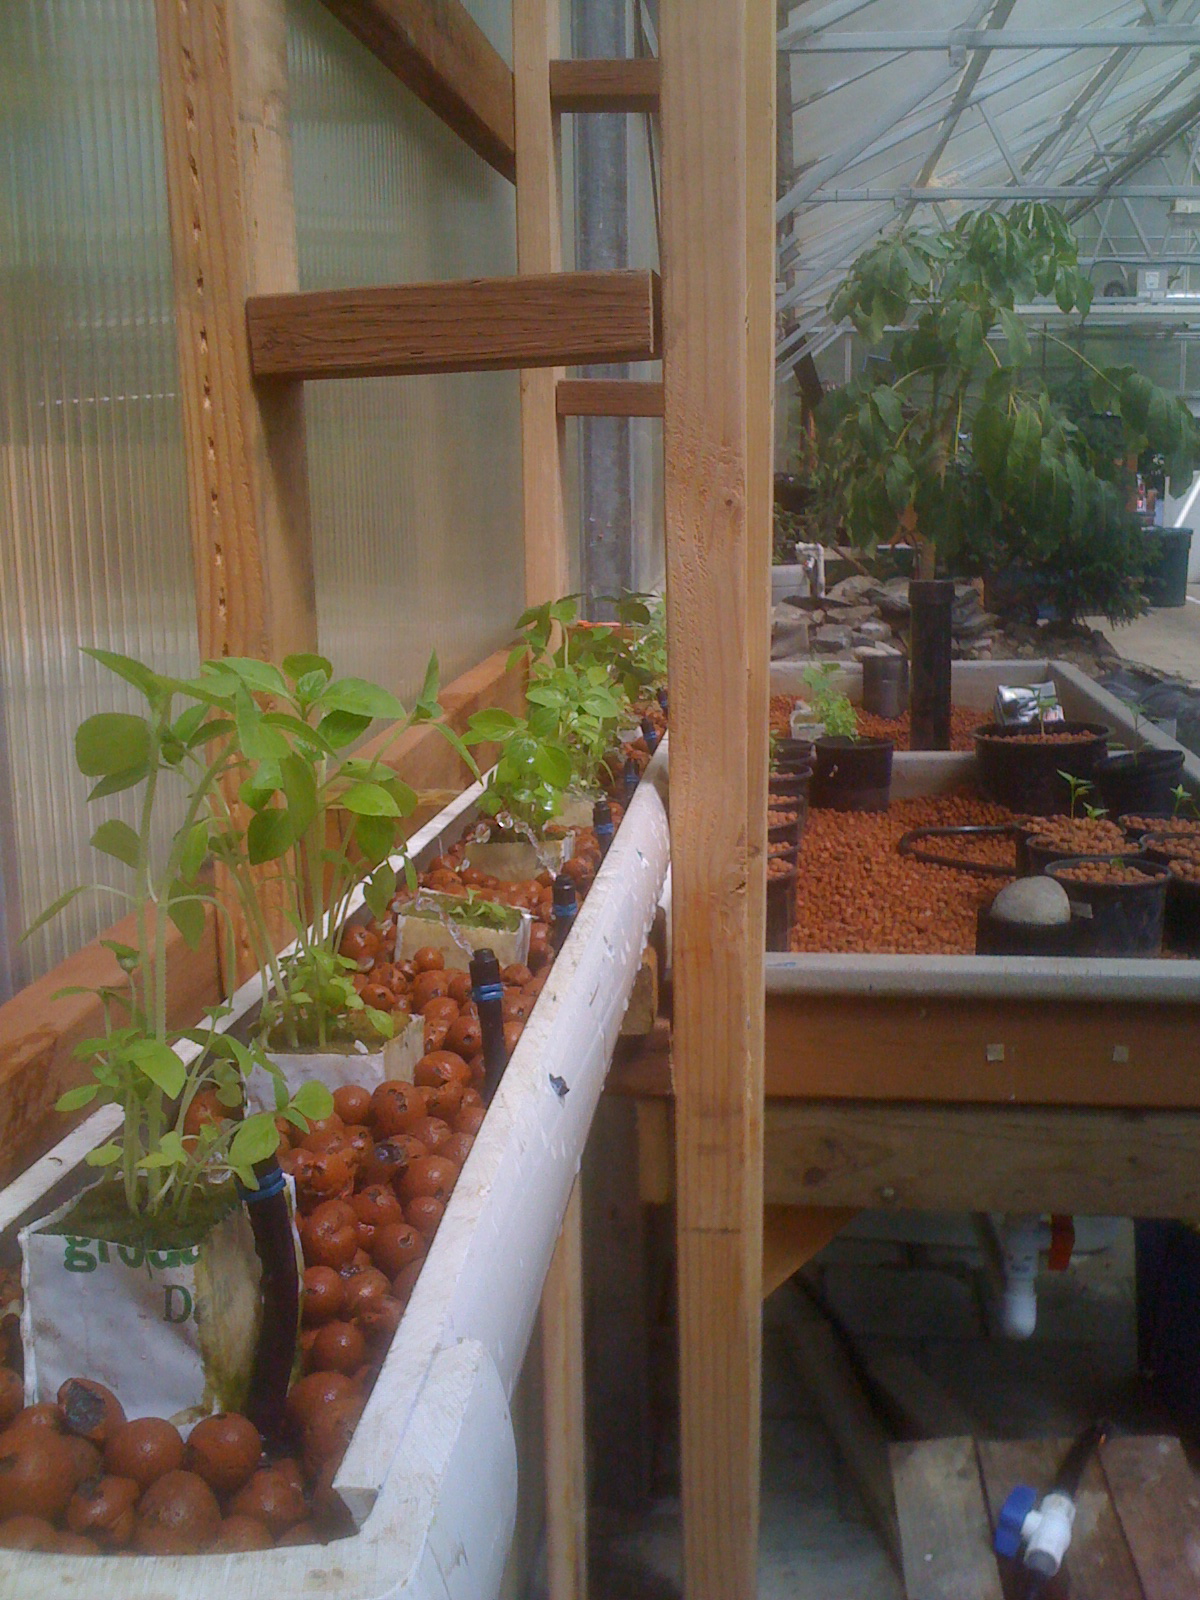
The hydroponic table awaiting conversion.

We needed to relocate the system
(not too bad with the help of friends). Done

Built Affnan Bell Siphon
(one is complete - half table at a time).

Repair the drain broken in transport
(I didn't say it wasn't heavy - fell once) Done.

Started seeds. Done (We like the pressure of time).

Get permission to create an in ground pond. Done.

Part II -
The bell siphon is working, thanks to my partner Mao.
We did break a pump during the transition. Amazingly, our facilities director found another one, the same day the first pump broke. We have a new 1800 GPH pump plumbed to the table, and temporarily working out of a fish tank (enough water to cycle half of the table. The siphon is set up to feed into the small tank and/or add an extension and drain to the pond.

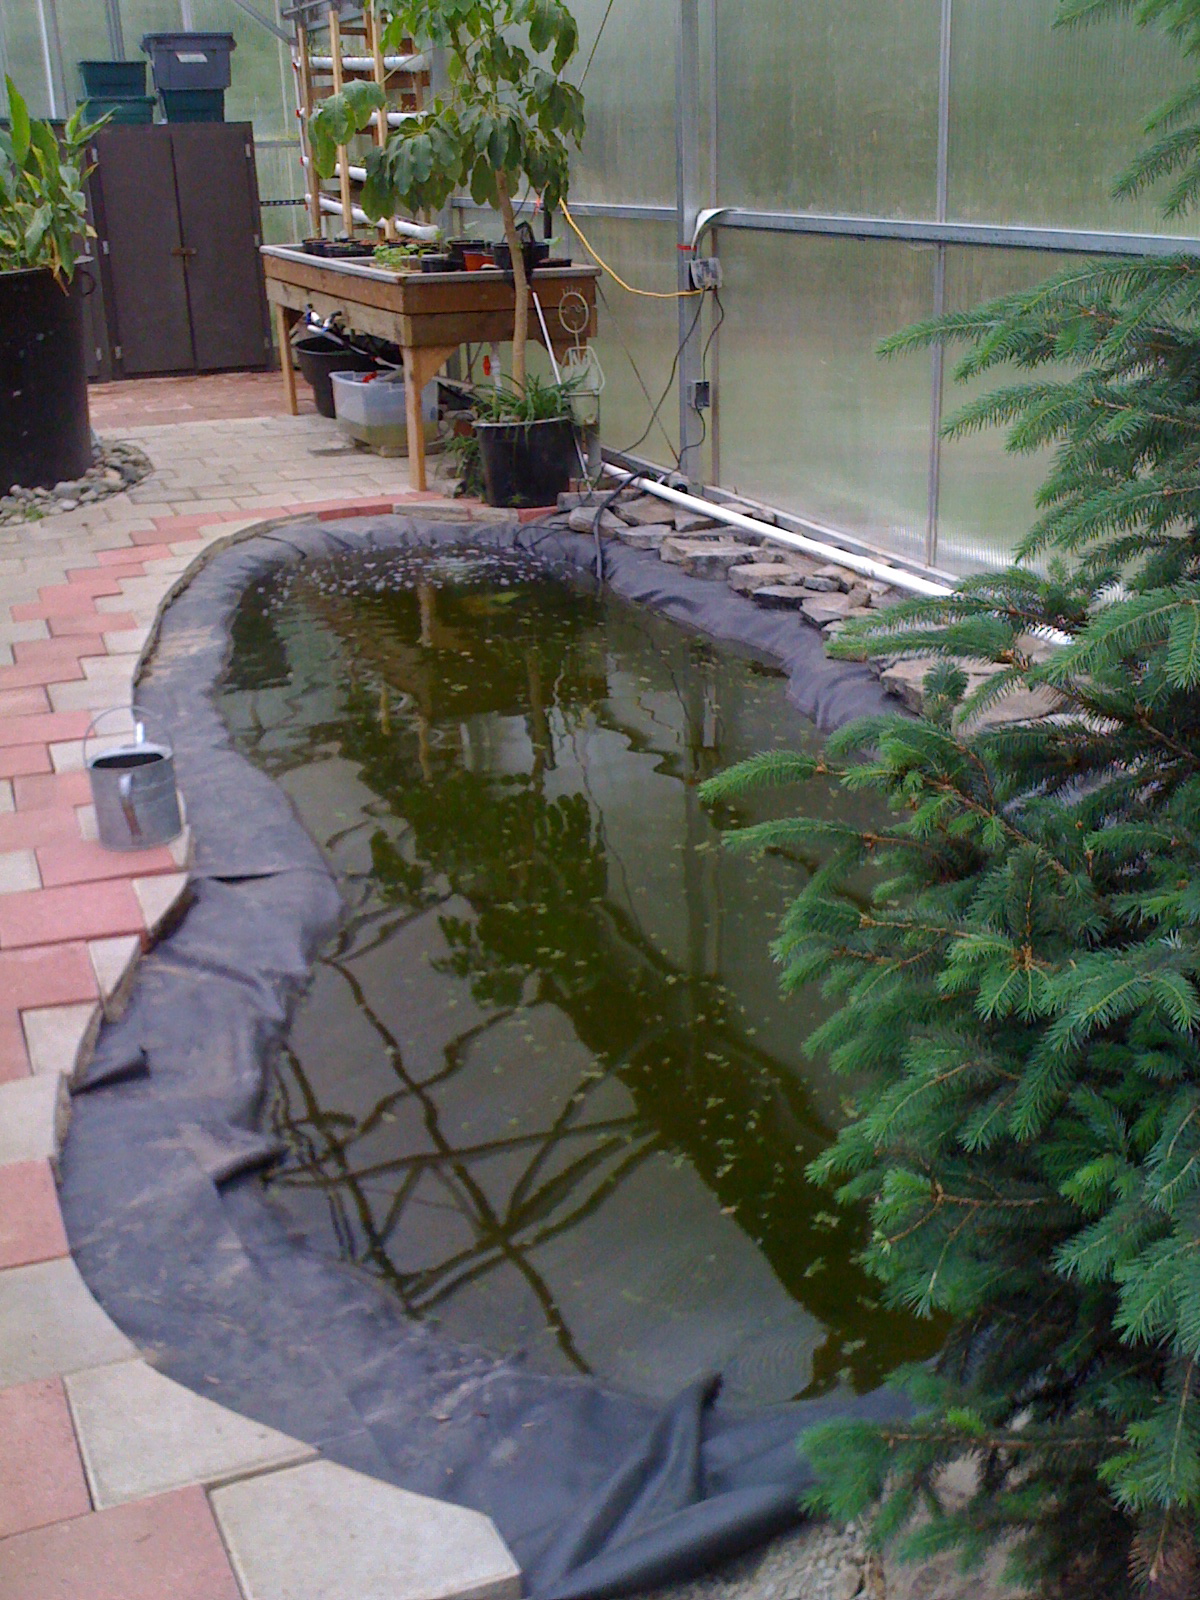
Temporary pump and drain in the pond.
The pond is dug. The assumption is that it is close to 1000 gallons (we are working on the math). The liner is in, and of course, we needed to fill the pond. It all cycles well, except the new pump is so powerful (not adjustable) that even when we minimize the openings on some of the valves, the table fills super quick, nearly at the speed of the siphon. We're assuming that when we split the flow to fill both halves of the table (and possibly a new NFT system), flow will be reduced and should work fine. We may need to operate on a timer instead of continuously. That should be fine. I wanted to add additional aeration, anyhow and on a timer it would be essential. I am a believer in massive amounts of dissolved oxygen to roots, to help with promoting growth.

We'll be adding a couple of sediment tanks to catch some of the solids moving through the system. It will be used as a spot to grow duckweed, too.


The to-do list...
1. Finish off some of the PVC work and design an efficient way to attach them to secure spots.
2. Build the two sediment tanks and plumb them into the system.
3. Purchase duckweed - get it growing
4. Plumb the aeration - we have big air on the other side of the greenhouse.
5. Area Beautification - Part of our commitment to get the pond in included making it attractive (funny, because Mao and i are all about function and physics).
6. Cycle the system - Let's get growing!
7. Get some fish.


Sunday, April 8, 2012

Converting the Hydroponics Ebb and Flow Table to Aquaponics

Many of you may have read my rant about the cost of organic, hydroponic nutrient solution, and how I'm sick and tired of paying an exorbitant cost to grow my lettuces, peppers and basil. This year, we're converting the large table to aquaponics, to use the natural fish emulsion and waste to grow our indoor garden. Hopefully, we'll continue to make our own worm-casting tea, to use as a foliar feed, as long as it doesn't have a negative impact on the fish (we'll research before we use it).
To put the pressure on, we started our seeds. To support our local hydroponics shop, we purchased some of their microbe-rich, nutrient solution to help start our organic seeds in rockwool. Now, we assume we have about two-weeks to finish the project and get the young plants into larger rockwool cubs that will eventually go into pots with clay pellets.
We started our research and decided on converting our old overflow pipes to an Affnan's Bell Valve. I'm still working on understanding the physics, and collecting pieces, but that seems to be one of the early essential steps.


We need to locate a large, relatively good looking reservoir. Our facility demonstrates all of our garden experiments to kids, so we want the fish tanks to clean and sharp looking. We are perusing Craigslist and putting out our feelers for a 200-300 gallon tank, that seems to be the correct size for our 120 gallon ebb and flow table. The closest thing I've found, that is a reasonable value is one of those truck bed water tanks. It's actually $200 for a 425 gallon tank. It's quite a drive to pick up, but we'll keep you in the loop. I've found a 200 gallon claw foot bathtub, too. It's got a lot of character, and might work, too.
Check back and we'll keep you updated.